
Wings and electronics installation
- Kai Reckstadt

- Jul 11, 2020
- 3 min read
Welcome back to my blog. Topic today are the wings. I will show you 2 big faults HK has made and how to fix them. The second part will deal with the electronics installation in the wings.
Besides the shortcomings of the kit already described the wings offer another 2 faults HK made. I can’t understand it because there are some examples of the real aircraft around the world which could be examined before or during the kit development.
The 2 faults belong to the placement of the dinghy in the right wing and the landing-lights under the left wing. HK took the opportunity to place a dinghy also in the left wing and another pair of landing-lights under the right wing. So it is necessary to eliminate the wrong panel lines and rescribe these areas and add new rivets.
First thing I did was to fill up the wrong panel lines with superglue:

This is the wrong panel on the left wing for the dinghy.

And the wrong landing-lights under the right wing.
Sourrounding them with Tamiya-Tape makes necessary sanding easier. It is also important to use a sanding-block for this work because you have to avoid sanding off too much of the plastic surrounding the filled panel lines, which will happen when you do it by hand because the superglue is very hard compared to the plastic:

For the riveting I use the tool I bought from famous modeler Radu Brinzan:
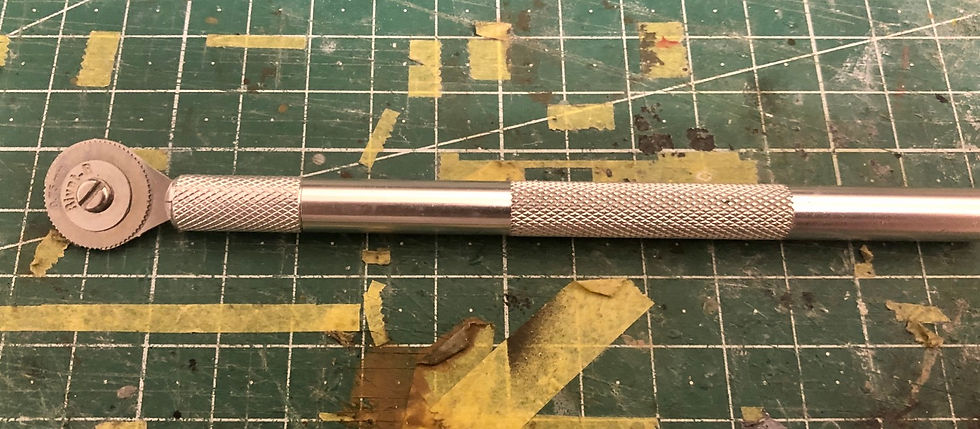
It is easy to use and offers a variety of rivet-distances. In case of the Lancaster the 0,75 mm wheel has to be used.
After having finished the sanding, rescribing and riveting I primed the areas to see if everything looks ok. This is how the areas look like now:

Left wing upperside without dinghy...

Right wing underside with eliminated landing-lights.
After this work was finished I started implementing the cable-harness into the wings. First I glued the LEDs for the position-lights into the wingtips. I had to remove the plastic-bloc where the LED would be placed and drilled a hole for it. Thanks to the stiff cables it was no problem to push the LED through the one-piece wingtip to the hole. There they were fixed with Bondic and painted green respectively red.
This is how they look like assembled and with the glass-part fitted:


As you can see glass-parts don’t fit well.
I had to sand them for better fit and they still have to be polished.
Then the speakers were glued into the wings between the engine nacelles.
I test-fitted the cable-harness and the nacelles to see if everything fits as supposed to. It’s a little bit fiddly because the wings are each one-piece.
Everything was ok, so I first glued the wingtips to the wings and then installed the cables running through the prepared holes to the engines. After this I fixed the harness in the channel I had prepared in the inner nacelle. Due to the one-piece wing photos are not really good to make but here I have some with all wing-components installed:

Way through the channel in the inner nacelle

Way to the outer nacelle

Exit on the wingroot and...

The plug and the cable-harness fixed with Tamiya-Tape.
And here are some pictures of the nacelles with the cables plugged to the engine-cables and glued in place with Bondic:

Inner nacelle

Outer nacelle

Inner nacelle with upper cowling fixed. As you can see an insert piece was needed at the connection to the wing.

Outer nacelle with fillet necessary at the same place. That’s how good the fit of many parts of the kit is... 😩

Complete wing-underside with flap-parts attached. The extra-work needed for the ailerons will be one topic of the next post.
Finally for today some pics of the wings attached to the fuselage and undergoing a system-test:

surrounding lights dimmed and...

... in the dark...quite impressive and really a big model!
This was all for today. Topics of the next post will be how I corrected the next HK-fault at the ailerons and the assembly of the landing-gear and wheels. The tailwheel had to receive a special treatment for guiding the currency cables through them.
Hoping to meeting you in my next post.
I wish you a nice weekend!


Great information! Finding a reliable website designing company in Jaipur is very important for businesses that want a strong online presence. A professional team that focuses on responsive design, fast loading speed, and SEO-friendly structure really makes a big difference. Thanks for sharing such useful insights.
I recently signed up with Mahadev Book and got my Mahadev Book ID within minutes — it felt like the online cricket ID process was super smooth. The Mahadev Book App loaded fast, and I could link my IPL betting ID for the next big match. I’ve also seen references to Laser247 and Gold365 promotions — nice to have options. The site is simple and reassuring for a new user.
To know more visit : https://maahadevbooks.com/
I joined Cricbet99 recently, and the first impression is solid. The Cricbet99 login page loads fast, and getting a Cricbet99 ID took less than a minute. I like that they have a dedicated Cricbet99 app for gaming on the go. The Cricbet99 live casino offers a thrilling experience — it feels just like a real casino. Plus, I’ve already had a small Cricbet99 win, which makes it even more exciting to stay active in the Cricbet99 club.
To know more visit : https://officialcricbet99.com/
mmatoto | mmatoto | mmatoto | mmatoto | mmatoto | mmatoto | mmatoto | mmatoto | mmatoto | mmatoto | mmatoto | mmatoto | mmatoto | mmatoto |
toto slot | toto slot | toto slot | toto slot | toto slot | toto slot | toto slot | toto slot | toto slot | toto slot | toto slot | toto slot | toto slot | toto slot |
toto togel | toto togel | toto togel | toto togel | toto togel | toto togel | toto togel | toto togel | toto togel | toto togel | toto togel | toto togel | toto togel |
mmatoto | mmatoto | mmatoto | mmatoto | mmatoto | mmatoto | mmatoto | mmatoto | mmatoto | mmatoto | mmatoto | mmatoto | mmatoto | mmatoto | mmatoto |
toto slot | toto slot | toto slot | toto slot | toto slot | toto slot | toto slot | toto slot | toto slot | toto slot | toto slot | toto slot | toto slot |
toto togel | toto togel | toto togel | toto togel | toto togel | toto…
This was such a delightful read! I truly appreciate your emphasis on self-care in beauty routines. It’s not just about looking good Mahipalpur Escorts it’s also about feeling good and nurturing ourselves.